Thursday 15 August 2013

Lost my mojo!

As the title says, I've been feeling a little deflated when it comes to painting this week. True, there's a load going on in other parts of my life that are demanding and attracting my attention, but my last painting experience on the weekend had me hit a bit of a wall.

I will push through it, but it has meant I skipped my normal Wed night painting session - just didn't feel up to it.

I made a tiny bit of progress over the weekend on my tanks, and about the millionth coat on my Ecanus robes.

Let's start with the highlight - the tanks.

First of all, I messed around with black oil paint, heavily thinned with Mineral Turpentine (White Spirits) to tone the dark green on one of the tanks right down to a very dark green. The intention was to highlight back up to the original dark green and then further up the scale to a bright warm green.

I'm not sure if it was a lack of coats on the original green, or a flawed idea, but it just didn't look right in the end.

Here's some pics:

As you can see, it's practically black! When I started highlighting it was pretty clear it was way too dark; so much so I was too embarrassed to take pictures!

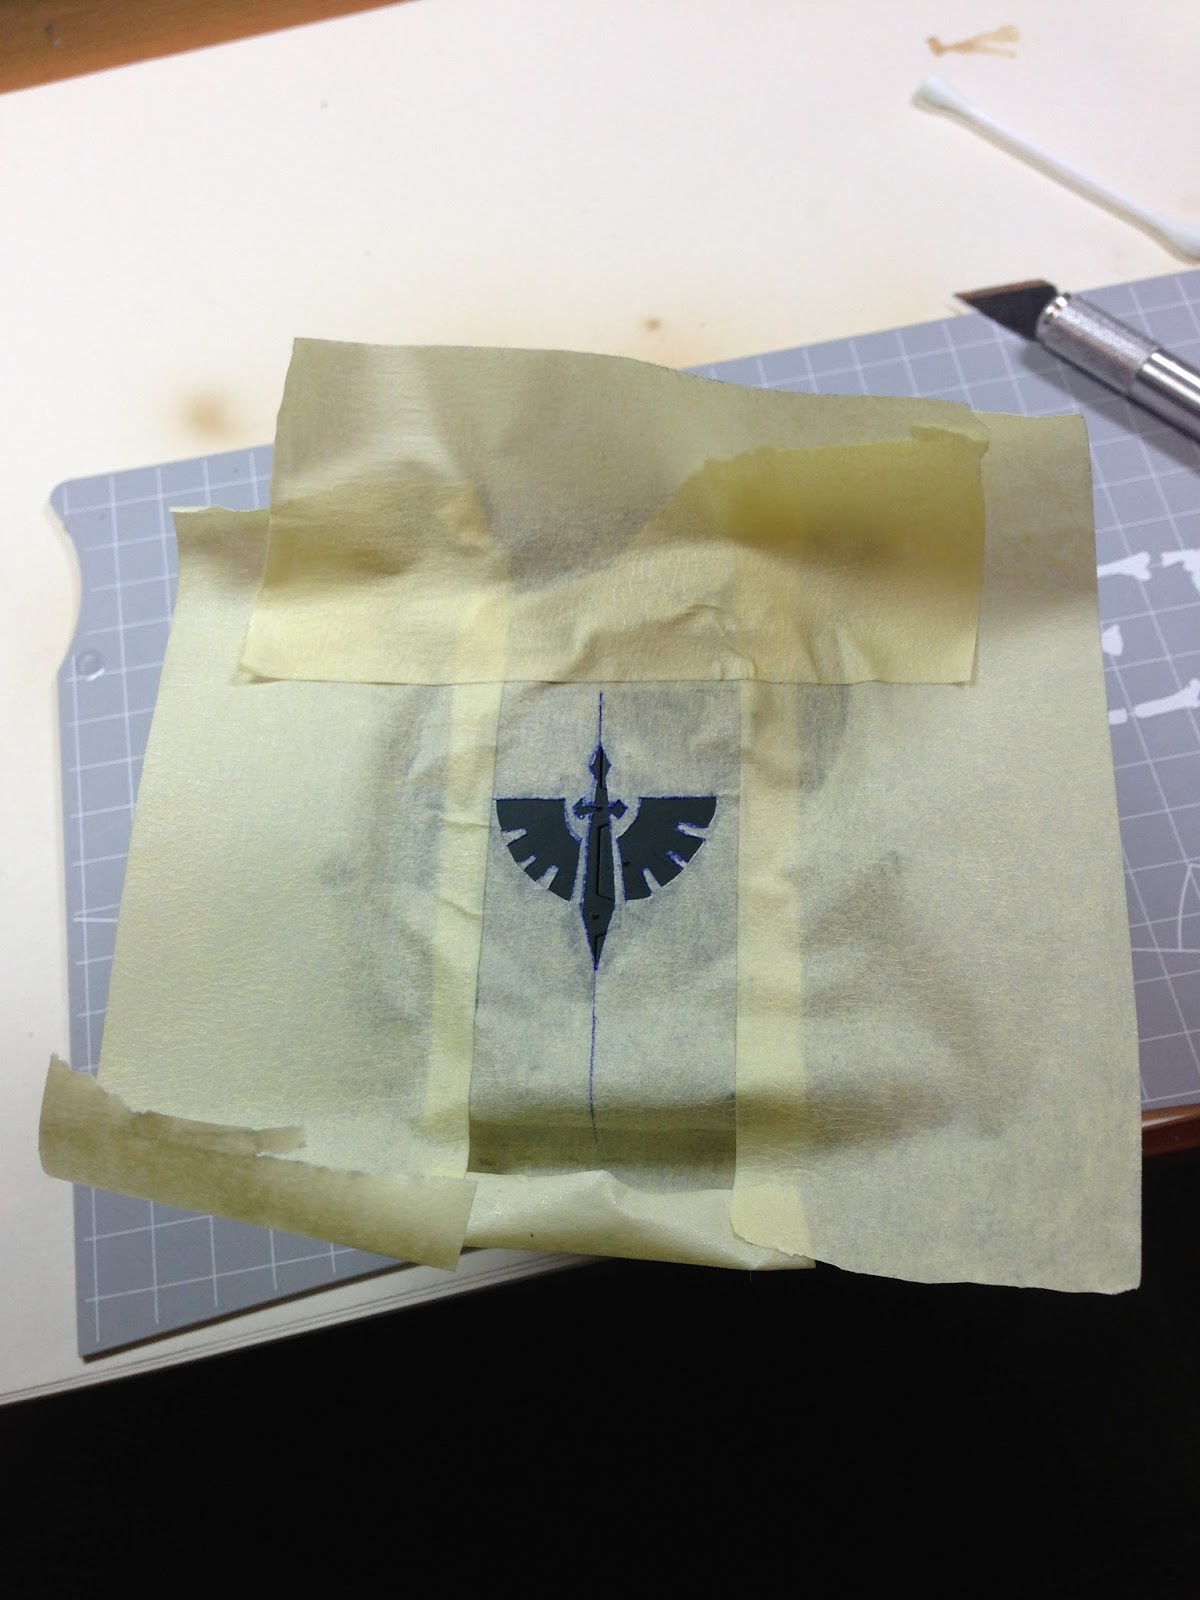
Unperturbed, I continued with my tests on the other tank. First of all, I cut a random shape out of masking tape (a star and a random square thingy), masked the back of the tank and sprayed first green, then white. I didn't take any pics of the final picture, but it did come out perfectly. This means I've proven the method to be effective; so long as I spray the original colour first I prevent any bleed from the new colour through the mask. I did somehow, mysteriously, magically end up with overspray on the other side of the tank! I have absolutely no idea how white paint managed to pass over the top and land on the front of the tank, but I shall mask more carefully moving forward.

Onwards! 

Next I experimented with Medium Green highlights. Mixing it 1:1 with thinner, I carefully built up highlights on the edges and top of the tank. I've got to say, the colour and tone was exactly what I was hoping for! I actually expected to need a third colour but have decided against it.


As you can see, I might have gone a little overboard and will try backing off the scale of the transition in future. You can also see where my hand-held mask I used to spray straight line transitions didn't quite work - will need to watch that a lot more carefully in the future.

Overall, though, I'm very happy with the result. It's now ready for edge highlighting in Pale Green, varnish, oil wash and weathering!

On to the lowlight - robes.

I've watched the BuyPainted videos a hundred times, I seriously can't see how the heck he airbrushes the cracks between the folds robes without also covering the highlight area with dark paint. Seriously, it's less than 1mm between cracks! I've literally resprayed test robes over 10 times and I'm giving up at this point.

From now on, I will be spraying a base coat and maybe shadows, but everything else will be highlighted with a brush - the point of the airbrush was to save time, but this has had the opposite effect; it has wasted my time and sucked my motivation down with it.

The only saving grace is I've found a colour pallete I like much better than the previous one; much warmer browns and a more natural transition to the bone\sand primary colour. Unfortunately I don't have the paint names on me, so will have to update it later.

Anyways, will probably paint next week now, will have another update then. Until then, have fun painting, and avoid breathing aeresolised turps!

Monday 5 August 2013

Project Regalia: A Colour Scheme Blueprint Part 4

Only a minor update as drying time is holding me up a fair bit (as is splitting focus with Command Squad Ecanus).

I am changing my plans as I'm just not happy with how things are looking - both for bone-coloured cloaks and for the tanks so far. To that end, my plans are now as follows:

Bone-Coloured Cloaks:
As I reported in my most recent blog post, I don't feel there's enough warmth in the cloaks' colour scheme at present. BuyPainted used two methods, one started with Med. Camo Brown and worked up through Khaki and Light Browns ending with Sand (Ivory); the other started with a Sand coat, then simply sprayed Sandy Brown into the recesses. I'm thinking that now my airbrushing skills have (vastly) improved, I may try the second method again on a test miniature - watch this space for updates.

Dark Green Tanks:
The reality is the current progress would deliver perfectly acceptable tank colour schemes. I'm just not happy with "acceptable", and would prefer to push myself a bit further. There's a guy called Nuclearsaur (sp?) on the interwebs with some simply stunning DA vehicle work I'd really like to attempt to emulate.

So, from here on in my two test tanks will diverge in terms of plan, as follows:

Tank 1 (Rhino):
- sprayed symbol by way of masking and airbrushing
- varnish coat
- oil-wash
- varnish coat
- weathering (via sponging a dark colour, and highlighting underneath)
- weathering powders
- pigment fixer
- varnish coat

Tank 2 (Predator):
- heavy wash in black oil paint to bring the current green tone right down to a dark green
- airbrush back up through Olive Green to a warm yellowy green
- varnish coat
- oil-wash
- varnish coat
- weathering (via sponging a dark colour, and highlighting underneath)
- weathering powders
- pigment fixer
- varnish coat

Experiment C: Dark Green Tanks
Day 2:
With the above plan in mind, and being scared to oil wash over wet paint, all I did with Tank 2 is put on a second dust coat of Olive Green to even it out a bit.

For Tank 1, I sprayed a second Olive Green coat, and then masked off and sprayed a white Dark Angels logo. Now, for the record, I picked the easiest Dark Angels logo I could find, not one I'd actually ever use (I hate the Dark Angle promo logo, but its easy as hell to mark and cut).

I cut the mask in masking tape (standard hardware store 24 hour painters tape), threw it on the Rhino and sprayed white.

Unfortunately I made two critical mistakes:
1) The tape quality is crap, so the edges bled. I've read that this can be prevented by buying better quality tape or spraying the original colour (green in my case) around the edges before spraying white. Apparently the latter technique means that if there's going to be any colour bleed, it'll be the original colour and won't be visible.
2) I put down the mask, then put more masking tape around it as a border, but still somehow managed to get overspray on some parts of the tank. I say somehow because I literally don't see how white speckles could end up on the front of the tank given the way I laid out the tape. Nevertheless it did, and I will ensure I mask better in the future.

Here's some pics:


Next Steps:
For "Tank 1" (I need better names!) I'll try fixing the white bleed with more green, but I'm not confident it'll be effective. Nor do I really care, that's why I'm using a test tank :) What I will do, however, is find another (smaller) logo and another place to spray it and perform the exercise again, using what I learnt, to ensure I have a known good method of achieving the technique. Then I'll go back to my plan stated above.

For "Tank 2", the next time I sit down I'll be tinting that puppy with oil - I'm excited to get into the new plan!

Closing Thoughts:
I enjoyed myself! I learnt some things, and while I was disappointing by the bleed and lack of progress, this is the whole point of Project Regalia, so I remain optimistic and enthused. More updates due this Thursday.

Until then, happy painting! :)

Squad Ecanus Minor Updates

Got a few hours in yesterday, but not much progress to report - even using an airbrush, painting cloaks is a time consuming process.

Anyway, Squad Ecanus got another dust coat of Olive Green on the armour, and I finished the bone cloaks off too. I did deviate slightly from my blueprint in the hope of achieving additional contrast between colours, though I'm not convinced I was successful. Will find out when it comes to washing I suppose. I suspect I'll end up changing the process significantly, I'm just not digging the raw colours I'm using (even were the contrast between highs and lows greater) - they aren't "warm" enough for my liking.

A few pics are attached below; my VMA colours were:
- Med. Camo Brown
- Khaki Brown
- Light Brown
- Sand (Ivory)
- White

I also didn't like how grainy the white was, will have to watch that moving forward (might need some thinner and lighter coats).


Thursday 1 August 2013

Project Regalia: A Colour Scheme Blueprint Part 3

Experiment C: Dark Green Tanks
Day 1:

I have to admit, I had a ball painting last night! This is a combined update as I had completed a couple of steps last week. My two test subjects are an old Rhino I hastily put together a couple of years ago to test a horrible batch of VGC Dark Green, and a Predator chassis I broke the sponsons off and couldn't be bothered repairing.

1) Undercoat in Vallejo Black Primer (Iwata 0.35mm) @ 20 psi

2) VMA German Grey @ 20 psi, no thinner. I applied this coat all over both tanks, leaving the bottoms pure black (though there was a little more overspray than I would have liked).

Now I got to this point, I wasn't sure if I should skip straight to edge pre-highlighting, or paint another transition coat first. Looking at my range of VMA greys (pretty much the whole range offered), I painted some test patches - I was looking for a grey that was close to the Polyurethane Grey Primer used for top-down highlights in BuyPainted's videos, since the actual primer is way too grainy to use. Here's a pic of the test patches:


As you can see, even VMA Light Grey is a fair bit darker. Oh well, I figured since I have two tanks, I'll try both methods. 

2A) VMA Medium Sea Grey @ 20psi, no thinner. This was painted at the top of the sides and top panels as the final transition coat, but only on one of two tanks. Sorry about the slightly blurry pic.


3) Edge-highlighting: VMA Light Grey @ 20psi, no thinner. I used a piece of art paper as a hand-held mask and sprayed the edges of all panels on both tanks. Again, sorry about the blurry pic, though you can actually see the difference in transition coats better in this pic than the last.


4) VMA Black @ 15psi, no thinner. This pass, I carefully sprayed the panel lines and dark edges. A bit messy, but that's ok as the colour coat and wash will tone the variations down later anyway.

4) VMA Olive Green @ 20psi, no thinner. The colour coat.
Side shots:
Three-quarter shots:

Next Steps:
Ok, next up I need to decide if I'm spraying a 2nd coat of green (I think I will), then varnish, wash, highlight (if needed), varnish, weather, varnish. 

Closing Thoughts:
First off, I have to admit that the dramatic reveal at the end when you spray colour over a greyscale tank is thoroughly enjoyable! I was very happy with how much I've improved by airbrush control, and after a couple of minor stuff ups where I was way too close to the model, I found I could accurately paint a black dot over a rivet from six inches away with almost perfect accuracy.

Secondly, I can't see much difference at all in the tone between the tank with 3 transition layers vs. the tank with 2; perhaps you can? I'll probably skip this step just for the sake of time saving moving forward.

Finally, I think I sprayed too thick - as you can see, the edges of the tanks ended up quite a white-green. Whilst this doesn't look terrible (a LOT of painters edge highlight), I just don't much like the tron look that so many vehicles end up with. The question really is; if I spray a second coat, will it diminish the pre-shading to a point where it's invisible? If I don't, will the washing and weathering process tone it down sufficiently to tie it all back together?

I'll have to sleep on it :) Overall, though, I felt the experiment has been hugely successful so far. Just for shits and giggles, I'm also planning on painting a Dark Angels logo on the top of the Rhino. It's been done to death, and I'm not convinced I'd use that particular logo for my real army, but it'll give me an opportunity to practice complex masking. I might even try the hair-spray + sea-salt technique on that or another white logo as well.

Until next time, happy hobbying :)

Brief Ecanus Update


This will be a double update as I want to keep my experimentation separate from my actual painting progress.

Last night I threw a coat of VMA Light Grey onto all of the armour pieces from a vertical angle.


And then moved on to VMA Olive Green. 


All paint was airbrushed neat (I.e. no thinner), with grey @15psi and green @20psi. 

I'm pretty happy with the progress, they are looking ok and the blend from dark to light green is actually pretty good. I think I did spray a little thick, which resulted in the paint running away from edges and leaving me with some light-green edging, but I haven't yet decided if I'm going to bother with a second coat or just move on as I'm going to have to edge highlight anyway and this might save me a step. Not sure yet.

Next up is to finish the cloaks and start with the details on the armour pieces. 

Tuesday 30 July 2013

Ecanus begins

Not a big update today, spent way too much of my time trying to figure out why my H&S airbrush kept leaking - bubbles coming up through the paint in the cup, let go of the air-trigger and small amount of air continued coming out, etc. I never got to the bottom of it, will have to do some research before tomorrow night's painting session.

I did manage to get the first grey coat on the sides of the armour for Sq Ecanus (VMA German Grey), and the darkest browns on the cloaks (VMA Medium Camo Brown).

I also started on the test tanks, but will leave that for a separate update to avoid confusion; very happy with the first coat though.

Here's a couple of quick pics of where I'm at:


Sunday 28 July 2013

Priming is boring!

Ive had a few hours hobby time this week, but don't feel like i got a whole lot done. This is primarily because I had to pull apart my command squad to facilitate airbrushing them, and then reprime them all. I managed to do this with only a one minor casualty - a backpack that wanted to split in half rather than at the glue seam. I also decided to use a fresh Brother Bethor for the standard bearer rather than repaint the old one so lots of scraping and filing and drilling.

After many hours of boring work, they all looked like this; an army of bits attached to corks. 


Then on to priming. Anything that had bone white cloaks got a fresh coat of Vallejo grey primer, and all the armour bits got a coat of black. I also primed two test tanks in preparation for my vehicle experiments. I finished with them looking like this.


In the background I'm also slowly painting the interior of the squad's Razorback. I'm keen to get this finished because I've got something special in mind to clearly mark it as carrying important troops.

Wednesday is now officially Pete's Painting Day, so expect another update then. Until then, happy painting!

Sunday 21 July 2013

Project Ragalia: A colour scheme blueprint - Part 2

Managed to get a few hours painting in, thanks to my gorgeous wife for taking care of everything that needed doing while I relaxed. So, on we go with part 2 of my experiment :)

Experiment A: Bone-coloured Robes
Day 2:
After looking over the last 2 test marines, I found that I didn't like how red the Sandy Brown appeared, especially when partially coated over with Sand. As a result, I decided to try a different paint scheme on 3 of the 6 marines.

I repainted marines 1 through 3 with their Sand base coat to give me a fresh start. I then used the following sequence, all using my H&S Evo with 0.20mm needle:
1) Med Camo Brown @ 20psi, no thinner - concentrating on the deepest recesses and edges of the cloak only.


2) Light Brown @ 20psi, no thinner - leaving the darkest recesses alone, but essentially coating the rest of the cloak.


3) Light Brown + Sand 1:1 @ 20psi, no thinner - again, leaving some of the previous colour in the recesses and working my way back to the peaks of the cloak.


4) Sand @ 20psi, no thinner - now I left the folds in the cloak alone completely and very carefully painted the large flat areas and outward folds only.

5) Sand + White 1:1 @ 20psi, no thinner - painting only the edges of the outward folds and the centres of large flat areas.

        
6) White @ 20psi, no thinner - final edge highlights.


Results:
Wow! I don't really understand why I found the AB so much more controllable than the last painting day, but the end result is fantastic! Without thinning, and at 20psi, I found I could achieve a suitably fine line that I could control the blending of without too many issues at all. If anything, the only thing Id do differently is take out the Light Brown:White mix layer as the mid-tones need more contrast between layers.

Experiment A: Conclusion
I'm completely happy with the sequence I used above to paint cloaks. I'm almost certain the results will only improve with practice as I get better fine-line control, the colours are great, and removing one of the mid-tone steps will give me a good contrast between folds. I'm going to consider this experiment concluded and use this method on cloaks moving forward. Very happy bunny!

Experiment B: Dark Green Marine Armour
Day 2:
Ok, time to tackle this little frustration! I started with a black undercoat (for the third time!), and used my H&S Evo with .20mm needle.
1) German Grey @ 20psi, no thinner - sprayed a horizontal highlight. So far so good, this gave a nice smooth coat with no speckle.

2) German Grey + White + Thinner (2:3:1) @ 20psi - spraying a vertical highlight this went on smoothly, but wasn't nearly light enough. It was basically invisible...

3) Grey Primer @ 20psi, no thinner - again, spraying a vertical highlight. This coat was more controllable using the smaller AB, but again speckled. I'm beginning to think that the primer simply isn't suitable for anything other than an even coat over entire surfaces, but comparing my miniature to the screenshot I took from BuyPainted's video, I think it's as good as its going to get.


4) I did a quick little comparison of my alternatives to DA Green. In the photo below you can see the following:
- Left: GW Dark Angels Green
- Bottom: VMA Olive Green
- Right: VGC Dark Green


Ignore the top, it was DA Green but improperly mixed. You can see from the photo that Dark Green isn't quite a match to the original DA Green (hard to see from the photo, but DG seems to have less depth), but still considerably closer than Olive Green which is quite a bit darker. The consistency was different between all three, but at least this pot of DG has better coverage than the last pot, which is a relief.

The funny thing is, I laid out these samples while I was spraying my robes, and probably would have used DG with thinner had I sprayed the green armour right away. However, as they dried in the palette I found that DA Green turned a lot darker and was almost identical to Olive Green, whereas the DG essentially stayed the same colour. I decided to give Olive Green a whirl and see what happened.

5) Olive Green @ 20psi, no thinner - as I was applying a nice liberal coat evenly across the miniature, it was obvious it was going to look great. And I was right; as you can see below, the colour depth is fantastic as it transitions from dark to light, and blends excellently between tones.


Experiment B: Conclusion
Ok, I'm still disappointed that you can see speckle in the pre-highlight coat, but the method itself works perfectly. Moving forward I'll replace the Grey Primer with either a grey VMA tone, or mix a medium grey myself. This should give me a smooth tonal transition base for the Olive Green and let me get on with good results.

Day 2: Final Thoughts
I'm ready to close off both Experiment A and B at this point - I'm confident enough in both the colour scheme and method that I'll make the minor tweaks I've talked about on my next batch of actual troops. On to experiment C for the next painting session; DA vehicles. Having had a bit of time to think about it, and using the pre-highlight approach on the green armour, I think I've arrived at an approach I'll test out:
1) Prime coat in black
2) Base coat in German Grey, fading up from and leaving black at the bottom of the tank's sides.
3) Pre-shade panel lines in pure black
4) Pre-highlight edges in the medium grey mix/colour mentioned in the Green Armour technique
5) Olive Green coat
6) Figure out next steps - perhaps post-highlighting, perhaps just edge highlighting, will have to determine next steps based on how it looks.
Until next time, happy hobbying.
- Posted using BlogPress from my iPhone