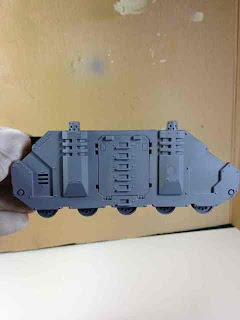
Great concept, but how the heck do I do it with Dark Angels Green? I need something that's going to match the way I paint my troops, else the vehicles just won't look contiguous with the rest of the army. My normal colour process for the armour on Dark Angel troops is as follows:
1) Black undercoat
2) 1:1 mix of Black and Dark Angels Green
3) pure Dark Angels Green, leaving the previous colour in the recesses
4) highlight with Snot Green (blend, edge highlights, etc. - depends on the detail-level I want)
So, given I start with a black undercoat, it's kinda difficult to paint a darker colour to pre-shade on a vehicle...What happens if I use a medium grey undercoat? That solves the pre-shade problem, but will it result in a brighter Dark Angels Green than my normal troops? Is there an alternative that will work instead?
Time for an experiment :)
I've used an old Rhino as a test vehicle, primarily because it has non-Chapter doors glued on and I've decided all of my vehicles will have DA doors from FW. I intend to compare the following:
1) A pre-shade using medium grey as the undercoat colour
2) Use my troops process on the vehicle to compare results
Without further ado, here's where I got to in a few hours of messing around last night. All paint is Vallejo Game Color and thinned with Windex. Numbers in brackets are droplet count for mixing.
1) Base-coat Cold Grey:Windex (60:20) at 20psi
2) Pre-shade Black:Windex (60:20) at 5psi
I noted here that pressure was too high at 10psi so I lowered it to 5, but still found it too high (it was blowing wet paint around). Not sure if this is a pressure issue or the paint was too thin, will need to research.
3) Light coat of Dark Green:Windex (60:15) at 15psi
I noted here the paint was waaaaay too thin!
4) Light coat of Dark Green:Windex (60:5) at 15psi
I noted here it was a little better, maybe even a bit too thick, but I didn't wait long enough between coats (I'm impatient!)
This is where I left it so it had a chance to dry completely. It probably needs two more really light coats, probably thinned somewhere between the two previous tests. Will post updates as I progress.
-----------------------------
In the other corner, the progress is a lot harder to see, and not as far down the path. I managed to get one coat of the darker green colour over a black undercoat. The colour I mixed was absolutely perfect to match the first stage I use on my troops, so I'm pretty happy, but it needs a second coat of this mix before I proceed to DA Green.
You can't really see the colour from the photo, but here it is anyway :P
All in all, a good night of experimentation, certainly learned a little about my airbrush. You can see from the last photo I was also messing around with thin lines - I am far from perfecting this, but I at least have a starting point of knowledge to build on now (5psi, about half an inch or so from the object renders a line about double the thickness of a felt tip pen, which is good for a start).


Sounds like we use similar pre-shading techniques. Mine tend to be not so drastic between dark and light, but the effect is still pretty awesome.
ReplyDeleteNever tried Windex before. I found isopropyl alcohol (rubbing alcohol) tends to work amazing as an airbrush thinner. Also because there are oils in the paints, the alcohol breaks them up better, helping them flow a bit more efficiently.
ReplyDeleteThanks very much for your comments Darian. Unfortunately I haven't had much time to progress this, but hopefully will soon. I've just received a shipment of Liquitex Acrylic Matte Medium, so I'll be experimenting with that as a replacement to Windex - I've found that if I spray for more than 20 minutes I get headaches and I'm sure Windex isn't doing my lungs any favours either :)
ReplyDelete